Friday, October 7, 2011
Announcement
Okay, so I haven't updated in awhile and I have a good reason for that. I've moved all my blogging to over here. I've combined Shiloh's Stitches and Cafe Strawn with the addition of any miscellaneous stuff I wanna blab on about. I'll leave this blog up for the archive purpose, but all new recipes and the like will be over at the new blog. I already have some up, so go check it out, and don't forget to follow! Thanks! :)
Sunday, March 20, 2011
Calzones
I found a couple of recipes for homemade calzones in my two Betty Crocker Cookbooks that I have. One of them is from the 80's, while the other one is a brand-new one. I kinda mixed the two together and this is what I came up with.
Ingredients
Directions
My Take
Ingredients
- 1 can of pre-made pizza dough
- Pizza toppings
- Pepperoni
- Sausage
- Mushrooms
- Black Olives
- Onions
- Etc.
- Mozzarella cheese, shredded
- Ricotta cheese
- Pizza seasoning
- 1 egg, lightly beaten
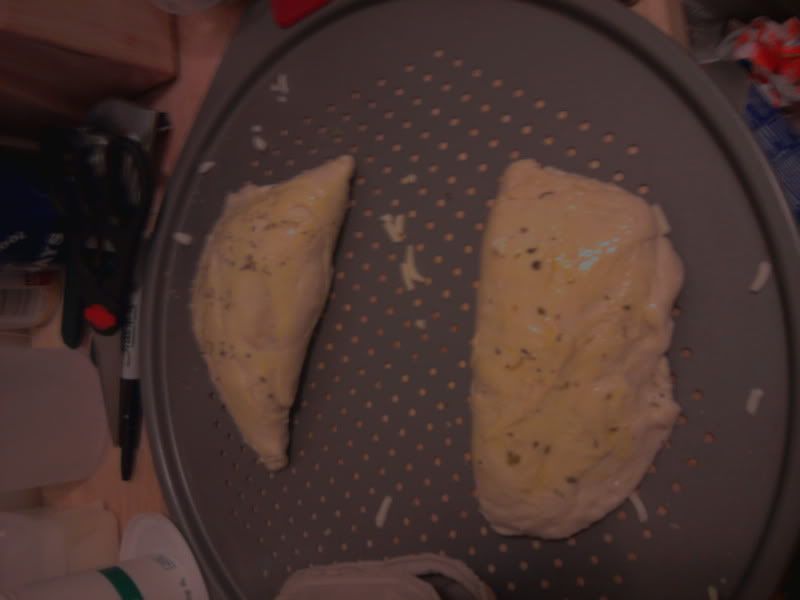 |
| Before they went into the oven |
- Preheat oven to 350°F
- Divide the dough into 2. Make them as round as possible.
- Put the pizza toppings, mozzarella and ricotta cheese on one half of the circles, keeping a 1/4" edge on the outside.
- Sprinkle the pizza seasoning over toppings/cheese
- Fold the empty side over on top of the filled side. Pinch or use a fork to put them together. Make sure the seam is tightly sealed.
- Brush the egg on top of the now sealed calzone. Lightly sprinkle some more pizza seasoning on top of the calzone.
- Put into the oven and cook for about 20 minutes or until the crust is golden brown. Don't be surprised if they grow a bit.
- Take out and serve with the sauce of your preference. We had marinara. :)
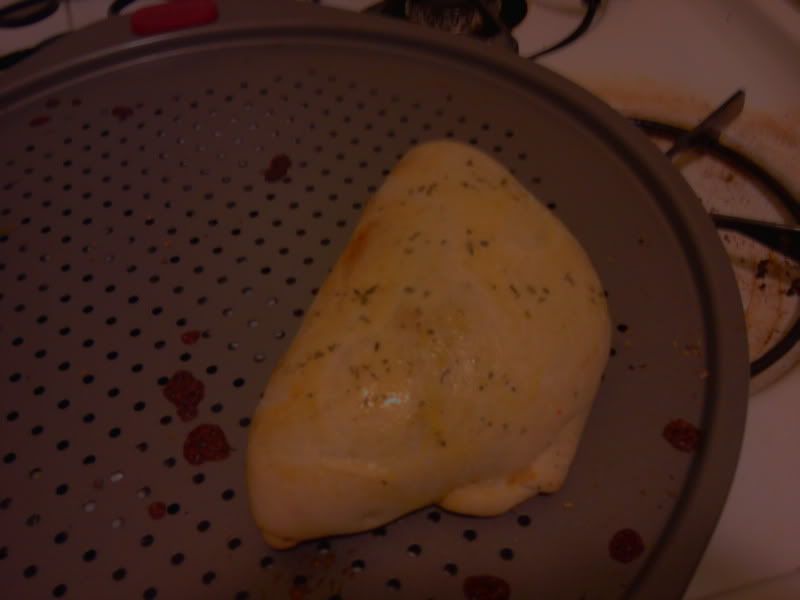 |
| All done! |
I was very amazed at how easy these were to make. Whenever I go to Old Chicago, I always order their calzones, but now I can make them in the comfort of my own home without high prices!
You can put the sauce inside the calzone, but I didn't want it too messy as well as (I believe) traditional calzones don't have the sauce in them. Also, make sure you're careful not to fill them up too much, otherwise the dough might split and yeah....that wouldn't be too good.
So, there ya (finally) have it. My calzone recipe. Feel free to leave comments about what works for you and any questions you have. I promise I won't take a week to reply! :)
Wednesday, March 9, 2011
Cheesy Breadsticks
I totally made this recipe up after Dylan pointed out a bag of frozen ones at Wal-Mart. I said I could make them, so here is what I came up with. They are pretty easy to make and taste pretty good too!
Ingredients
 Directions
My Take
Ingredients
- Can of pre-made pizza dough
- 1 package of string cheese
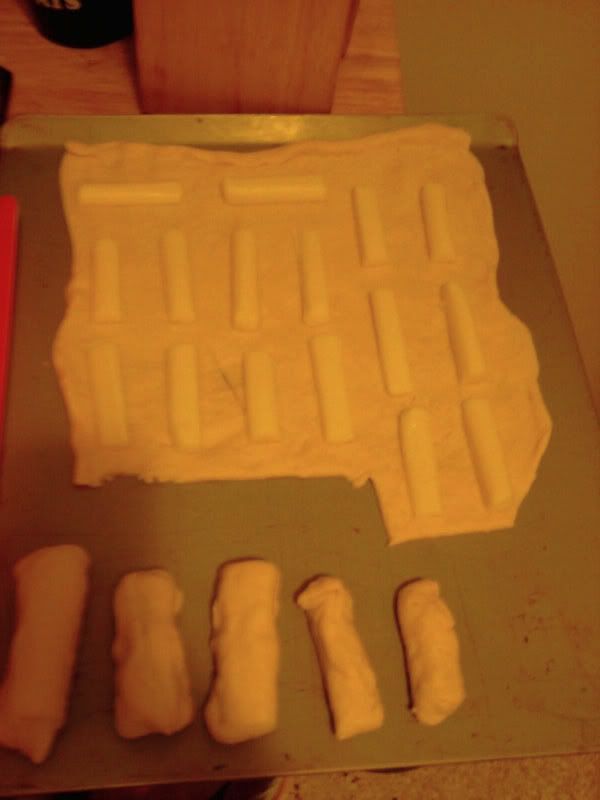
Directions- Preheat oven to 350°F
- Open can of pizza dough and unroll it.
- Cut string cheese in half, and then cut them in half lengthwise.
- Place pieces of cheese on dough, leaving about 1/4-1/2 inch between each piece.
- Cut the dough around each piece; should be a rectangular shape.
- Cover the cheese with the dough, making sure all the seams are securely closed.
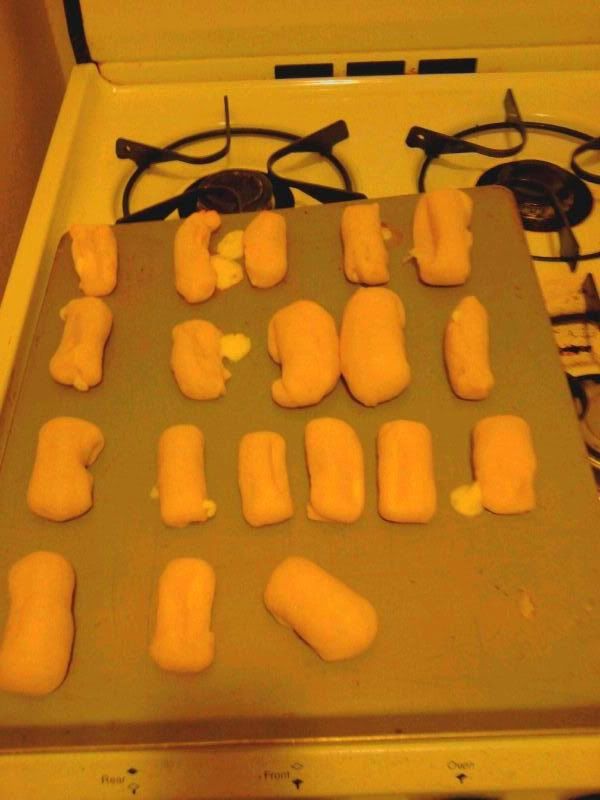
- Put on cookie sheet and cook for about 10 minutes, or until lightly browned.
- Serve with dipping sauce of your choice.
My Take
I made a couple that were just cut in half once, but I thought they were a bit too big. I liked them smaller, plus they would work better for appetizers, in my opinion.
I dipped my breadsticks in marinara sauce, which was very tasty.
I asked Dylan if they needed any other seasoning, and he said they were good the way they were, so I'm marking this down as a success.
Also, I think I only used half a package of string cheese, but I'm not quite sure. I bought a full package, so that's what really counts, right? :p
 |
| Bursting with ooey gooey cheesy goodness. |
Tuesday, March 8, 2011
Sorry. Again.
Life has suddenly become quite busy and stressful for me as of late, so when I get home, I'm not really in the mood to cook anything extravagant or anything like that. The thing I've cooked the most as of late has been pancakes using Bisquick mix. That stuff is amazing. I went through a box in a month. :p
Anyways, I finally sat down and planned out some menus (which is really usefully, by the way) and I have 3 days which I'll be cooking meals. Tonight, I'm going to be attempting to be making calzones with cheese sticks. I have a recipe for the calzones (never used it before), but the cheese stick recipe I'm totally making up as I go along. I'll keep you guys posted on how that all turns out.
Secondly, I'm going to be making turkey burgers with home made fries. Both of those are things which I do all by sight, but I'll post what seasonings I use so you can maybe try it at your house.
And finally, I'm making beef enchiladas. Again, this is a recipe I've had, but never used before. I was kind of hoping to use my mom's recipe, but I found that I didn't have that one, so I'll try a new one instead.
So, those are the recipes I'm going to be making this week. I'll try to post the recipes either the night of or the day after I make them. Now I have to run to the grocery store so I can get all my ingredients! Ciao~
Thursday, February 17, 2011
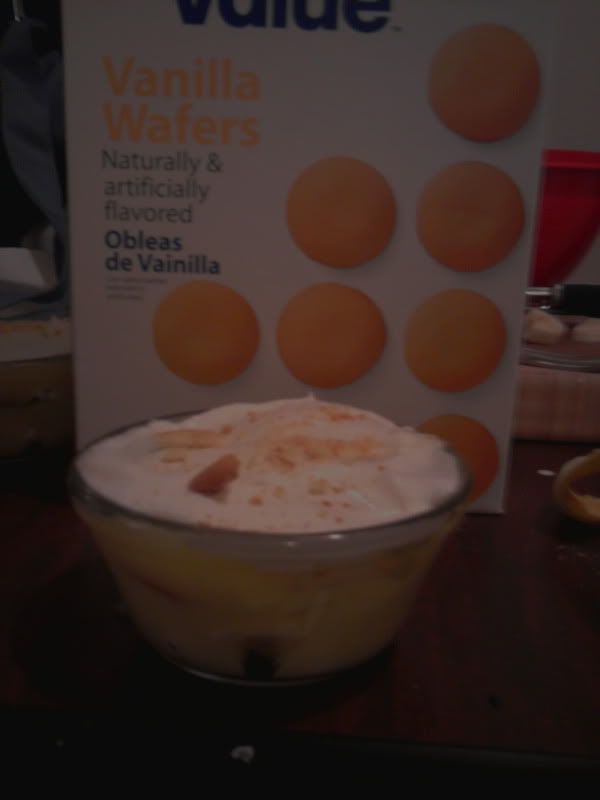
Banana Pudding
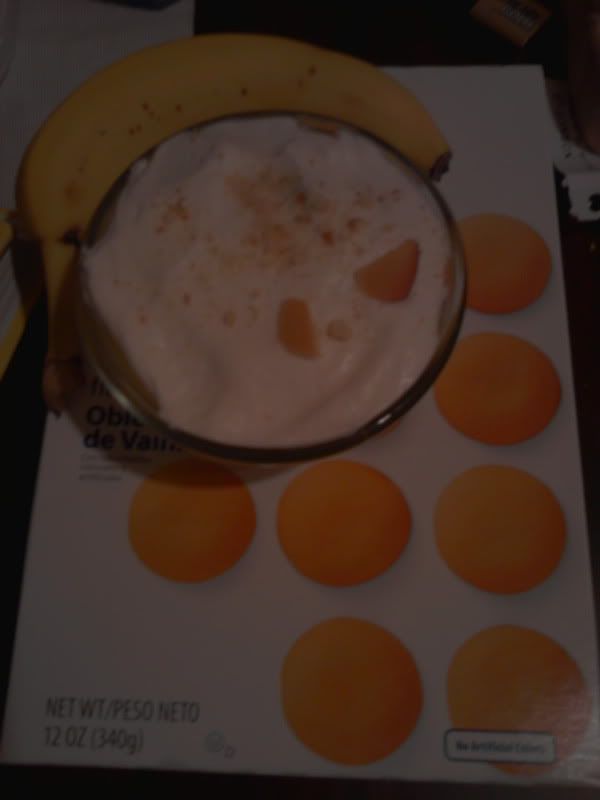
Ingredients
- 1 package of banana pudding (the 5 minute kind)
- Nilla Wafers
- Bananas
- Cool Whip
Directions
- Make banana pudding according to directions on package, but keep it in a large bowl for now.
- Put a row of Nilla Wafers in 4 (or six, depending on how many servings your pudding will make) custard cups.
- Then, put a row of cut bananas
- Pour some of the pudding into the cups
- Repeat the layers again.
- Top with Cool Whip and crushed wafers
- Put in fridge for 5 minutes
- Serve and enjoy!
 My Take
I believe this is known as "Southern" banana pudding, as the "Northern" kind is baked and served warm, but this kind is so quick and easy to make that it's the kind which we make in my house. Guess we're just a bunch of Yankees. lol
You can also put them all in one big bowl and serve it family style if you want to. I fear if I did that here, I wouldn't get anything but crumbs. XD
Wednesday, February 2, 2011
Sorry....
Sorry for not having a post up last week. I got a really big stomach bug last week, which totally made me feel like cooking...nothing! I haven't really tried any new recipes lately, as we've been falling back on tried-and-true favorites around here, but tonight I'm thinking of making spaghetti and turkey meatballs. I think I may put my recipe for the turkey meatballs up here later tonight.
Anywho, that's my update for today. Hopefully you'll see me a bit later today!
Anywho, that's my update for today. Hopefully you'll see me a bit later today!
Saturday, January 22, 2011
Cincinnati Chili
My first time making chili, so I thought it went over pretty well.
Ingredients
It turned out pretty good. I didn't really get to taste it, as by the time it was done, it was close to midnight. Also, it wasn't as watery as I was expecting it to be. Maybe that's because I had to stop cooking it and then start cooking it again. Probably not a good idea, but it kinda had to be done.
On a note of ingredients, I only used one onion, and just used regular ground beef. I think those were the only changes I made.
I think next time I make it, I may add kidney beans, 'cause Dylan apparently thinks that you need kidney beans in your chili to make it chili. Shouldn't be that big of a deal, right?
Ingredients
- 2 teaspoons vegetable oil
- 2 medium onions, chopped
- 2 teaspoons finely chopped garlic
- 2 pounds ground beef chuck
- 2 tablespoons chili powder
- 1 tablespoon ground cumin
- 1 teaspoon ground cinnamon
- 1 teaspoon salt
- 1/2 teaspoon dried oregano
- 1/2 teaspoon ground red pepper (cayenne)
- 2 cans (16 oz) tomatoes
- 1 can (14 1/2 oz) beef broth
- 1 1/2 cups water
- 1/2 square (1/2 oz) unsweetened chocolate, chopped
- 1 package (16 oz) spaghetti or linguine, cooked as label directs
Directions
- In nonreactive 5-quart Dutch oven, heat oil over medium heat. Add onions and cook, stirring occasionally, until tender, about 5 minutes. Transfer to small bowl; set aside. Add garlic to Dutch oven; cook 1 minute longer. Transfer to bowl with onions.
- In same Dutch oven, cook ground beef over high heat, breaking up meat with side of spoon, until meat is browned. Discard fat. Stir in chili powder, cumin, cinnamon, salt, oregano, and ground red pepper; cook 1 minute longer.
- Add tomatoes with their juice to Dutch oven, breaking them up with side of spoon. Stir in broth, water , chocolate, browned beef, and onion-garlic mixture; heat to boiling. Reduce heat; cover and simmer 2 hours and 30 minutes. Remove cover and simmer until thickened, about 30 minutes longer.
- Meanwhile, in a large saucepot, cook pasta as label directs. Drain. Serve chili over pasta.
- Makes 8 main-dish servings.
My Take
It turned out pretty good. I didn't really get to taste it, as by the time it was done, it was close to midnight. Also, it wasn't as watery as I was expecting it to be. Maybe that's because I had to stop cooking it and then start cooking it again. Probably not a good idea, but it kinda had to be done.
On a note of ingredients, I only used one onion, and just used regular ground beef. I think those were the only changes I made.
I think next time I make it, I may add kidney beans, 'cause Dylan apparently thinks that you need kidney beans in your chili to make it chili. Shouldn't be that big of a deal, right?
Monday, January 17, 2011
Chicken Nuggets/Strips
These are pretty quick and easy to make. I'm sure if you have kids, they'll love it too.
Ingredients
Ingredients
- 1 egg
- 2 tablespoons milk
- 3 1/2 cups cornflakes, crushed
- 1 pound boneless, skinless chicken breasts, cut into nuggets/strips
Directions
- Preheat oven to 400°F.
- Whisk the egg and milk together in a small mixing bowl. Place cornflakes in a plastic bag.
- Dip chicken pieces in egg mixture, then shake with cornflakes to coat.
- Put coated chicken on baking sheet.
- Carefully place baking pan in oven and bake for 15 minutes.
- Carefully remove the baking pan from oven.
- Serve
My Take
I love eating these things with honey or BBQ sauce. Dylan likes eating them with mayo.
Also, what I do to save time, is I buy the boneless, skinless chicken tenders. They're already pre-cut into strips, so I don't have to mess with that. I've never actually made them into nuggets, as Dylan and I prefer them as strips. But, I guess if you have younger kids, nuggets would be much easier to eat.
Saturday, January 15, 2011
No Update this Week
I know this is kind of late to be posting this, but no new recipe this week. One of my dear friends from high school passed away quite suddenly on Sunday, January 9th. This whole week has been really hard on me, and as the funeral was yesterday, I really don't feel like cooking.
I am planning on trying out a new recipe next week, just don't know what yet.
See ya'll in the kitchen.
I am planning on trying out a new recipe next week, just don't know what yet.
See ya'll in the kitchen.
Thursday, January 6, 2011
Tamale Pie
One of my New Year's Resolutions is to try one new recipe a week. Which means, my loyal readers, you get a new recipe once a week. I'll also throw some of my tried-and-true recipes in there for good measure. This week, you're lucky. You get two recipes! Isn't that exciting!?
Dylan and I love Mexican food. Sometime down the road I want to try making some authentic Mexican dishes, but for now, I settled on this tamale pie. Whenever I go to a Mexican restaurant, I have to have a tamale, so this particular dish sounded amazing to me. You ready? Let's start cooking!
Ingredients
- 2 teaspoons vegetable oil
- 1 medium onion, chopped
- 1 pound ground beef chuck
- 1 tablespoon chili powder
- 1 teaspoon ground cumin
- 1 cup medium-hot salsa
- 1 can (15 1/4 to 16 ounces) whole-kernel corn, drained
- 4 cups water
- 1 cup cornmeal
- 1 teaspoon salt
- 2 ounces Cheddar cheese, shredded (1/2 cup)
Directions
- Preheat oven to 350°F. In nonstick 12-inch skillet, heat oil over medium-high heat; add onion and cook until tender and golden, about 5 minutes. Stir in ground beef and cook, breaking up meat with side of spoon, until meat is browned, about 5 minutes. Skim and discard any fat. Stir in chili powder and cumin and cook 2 minutes longer. Remove from heat and stir in salsa and corn.
- In 2-quart saucepan, heat water to boiling. With wire whisk, gradually whisk in cornmeal and salt. Cook over medium heat, whisking frequently, 5 minutes
- Pour half of cornmeal mixture into shallow 2-quart casserole. Spoon beef mixture over cornmeal; spoon remaining cornmeal over beef and sprinkle Cheddar on top. Bake 45 minutes. Remove casserole from oven and let stand 15 to 25 minutes before serving. Makes 6 main-dish servings.
My Take
Now, as I've mentioned before, Dylan and I are very picky eaters. I think he's more picky than I am, but whatever. So, when I saw this contained onions, I, for a second, grimaced. Onions are one of my most disliked foods, but I love the flavor they can add to foods. So I got the bright idea that I could chop it up really fine and we would never notice. So I sliced half of a small onion and put it in my Magic Bullet. Er...it didn't turn out like I had planned. I think I used the wrong blade, so instead of being finely chopped, it came out as onion paste.
Okay, there was no way I was going to mix that with my meat, so instead I heated up the oil and cooked the onion paste a bit, just trying to get some of the flavor into the skillet. I think it kinda worked, but there were onions in the salsa, so I wasn't freaking out about it too much.
Another problem I ran into was I don't think it was done when I pulled it out. It might have had something to do with the fact that I didn't have a "shallow" casserole dish. The cornmeal wasn't completely set up. It wasn't firm, but it wasn't really watery either. It was just slightly gooey. I thought it was kind of hard to tell if it was done or not. It tastes fine, though, so I guess it turned out okay. It tasted really yummy.
I think next time I make this, I'm going to use a pound of turkey instead of the ground chuck. :)
Monday, January 3, 2011
Mexican-Style Spareribs
Alrighty, so I've tried cooking these ribs twice and what I've learned: Don't cook them on the grill! I found that alcohol and fire don't mix so well. Heh...should be obvious, ya? Anywho, this is a very good twist on the typical barbecue ribs.
Ingredients
Ingredients
- 1 cup firmly packed fresh cilantro leaves and stems
- 1/2 small onion, thinly sliced
- 4 garlic cloves, crushed with garlic press
- 1 pickled jalapeño chile
- 1/2 cup fresh lime juice
- 1/4 cup fresh orange juice
- 1/4 cup tequila
- 1 tablespoon olive oil
- 2 tablespoons sugar
- 1/2 teaspoon dried oregano
- 3 pounds pork spareribs
Directions
 |
| The sauce all mixed up |
- Preheat oven to 350°F
- In blender, combine cilantro, onion, garlic, pickled jalapeño, lime, and orange juices, tequila, oil, sugar, and oregano and puree until smooth.
- Place spareribs in nonreactice roasting pan just large enough to hold them in single layer. Pour cilantro mixture over ribs, turning to coat well. Roast, turning ribs twice, 1 hour 30 minutes. Turn oven control to 450°F and roast ribs until very tender and richly colored, about 20 minutes longer.
- Transfer ribs to warm platter. Skim and discard fat from sauce remaining in pan and spoon sauce over ribs.
- Makes 4 main-dish servings.
My Take
These turned out pretty well the second time. As mentioned before, I wouldn't advise cooking them on the grill, as the tequila in the mixture makes the flame jump up and char the ribs. They turned out much better in the oven. I liked how the flavors all came together and all that. Delicious and different than your typical spareribs. The only problem I had was the sauce in my pan burned around the edges, so I couldn't really pour the left overs on top of the ribs, but there was enough left on the ribs that you could taste it.
Since there's only two of us, there is more than enough left over for left overs. ^_^
Subscribe to:
Posts (Atom)